First ideas ...
First ideas ...
Day 1
Step 1. First Network Idea:
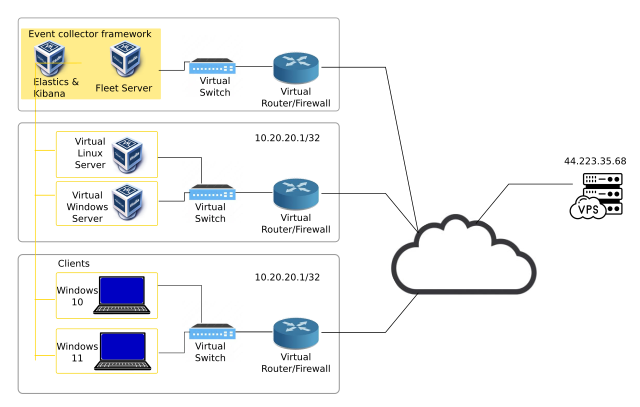 image caption
1.1. Starting planning:
- Given that each physical server has 08 Cores and 16 GB of RAM, I think is proper to deploy servers in one server and clients in another, and the event-collector framework in a third server.
 image caption
- So, first step is to deploy an OPN Sense Router in each server.
1.2. Configuring the networking in Virtualbox
So, we will have our lab network distributed in three different servers. Each of the servers, has a public IP Address. So, from my criteria, I see two practical options to connect the three networks:
- Either we use VPN tunnels for each connection
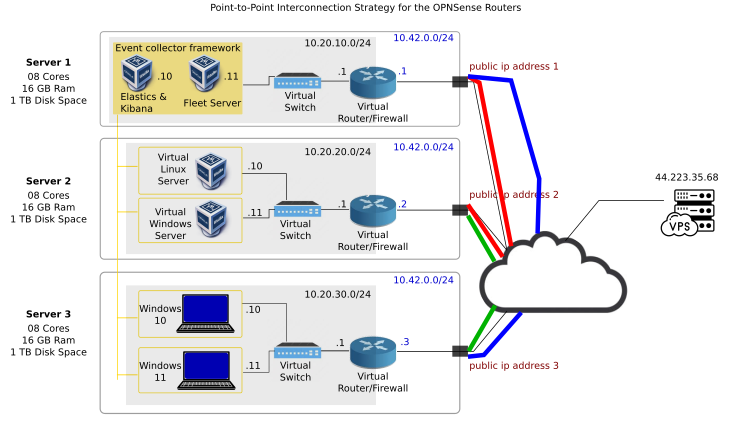 image caption
- or either we use a fourth router.
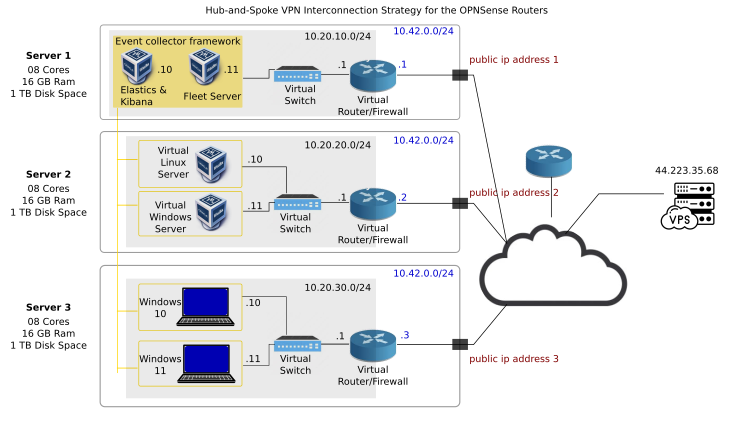 image caption
- But, I guess for now, we will take a look into the VPN solution because the second one is more complex. Maybe for another stage in the research.
So we are considering this topology:
image caption
To start case-showing this network architecture, we will start on server 1 with the implementation of the OPNSense Router.
Step 2. Deploy OPNSense Router in Server #1
- we go to https://opnsense.org/download/
- we setup the download selector:
 image caption
- we right-click on “Download” button and click on “Copy Link address” and obtain a file-link that we can download with
wget - https://mirror.serverion.com/opnsense/releases/24.7/OPNsense-24.7-dvd-amd64.iso.bz2
- It has to be the DVD image.
- we download it
 image caption
- We un-compress it:
bunzip2 -k OPNSense-24.7-dvd-amd64.iso.bz2
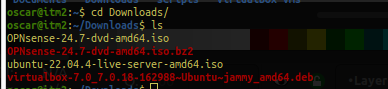 image caption
- And we create the router vm with virtualbox:
1
2
3
4
5
6
7
8
9
10
11
12
13
14
15
16
17
18
19
20
21
22
23
24
25
26
27
28
29
30
31
32
33
34
35
36
37
38
39
40
41
42
43
44
45
46
47
48
49
50
51
52
53
54
55
56
57
58
59
60
61
62
oscar@itm2:~/scripts$ cat deploy_opnsense.sh
#!/bin/bash

# Set VM name and parameters
VM_NAME="OPNSense"
COMPRESSED_ISO_PATH="/home/oscar/Downloads/OPNsense-24.7-dvd-amd64.iso.bz2"
ISO_PATH="/home/oscar/Downloads/OPNsense-24.7-dvd-amd64.iso"
VBOX_DISK="/home/oscar/VirtualBox VMs/OPNSense/opnsense.vdi"
VM_RAM=6144
VM_VRAM=16
VM_CPUS=4
DISK_SIZE=20480 # Size in MB, equivalent to 20 GB

# Check if paths are set
#if [[ "$COMPRESSED_ISO_PATH" == "/home/oscar/Downloads/OPNsense-24.7-dvd-amd64.iso.bz2" ]]; then
#    echo "Please update the COMPRESSED_ISO_PATH and VBOX_DISK variables with actual paths."
#    exit 1
#fi

# Uncompress the ISO file if not already uncompressed
if [ ! -f "$ISO_PATH" ]; then
    echo "Uncompressing the ISO file..."
    bunzip2 -k "$COMPRESSED_ISO_PATH"
    if [ $? -ne 0 ]; then
        echo "Failed to uncompress the ISO file."
        exit 1
    fi
    echo "ISO file uncompressed successfully."
fi

# Create a new VM
VBoxManage createvm --name "$VM_NAME" --ostype "FreeBSD_64" --register

# Set memory and CPU
VBoxManage modifyvm "$VM_NAME" --memory $VM_RAM --vram $VM_VRAM --cpus $VM_CPUS

# Create a virtual disk
VBoxManage createhd --filename "$VBOX_DISK" --size $DISK_SIZE

# Attach the virtual disk
VBoxManage storagectl "$VM_NAME" --name "SATA Controller" --add sata --controller IntelAhci
VBoxManage storageattach "$VM_NAME" --storagectl "SATA Controller" --port 0 --device 0 --type hdd --medium "$VBOX_DISK"

# Attach the ISO file
VBoxManage storagectl "$VM_NAME" --name "IDE Controller" --add ide
VBoxManage storageattach "$VM_NAME" --storagectl "IDE Controller" --port 0 --device 0 --type dvddrive --medium "$ISO_PATH"

# Set boot order
VBoxManage modifyvm "$VM_NAME" --boot1 dvd --boot2 disk --boot3 none --boot4 none

# Network settings
VBoxManage modifyvm "$VM_NAME" --nic1 bridged --bridgeadapter1 "eno2"  # Change "eno2" to your actual network interface
VBoxManage modifyvm "$VM_NAME" --nic2 intnet  # Internal network for LAN

# Optional: Enable I/O APIC
VBoxManage modifyvm "$VM_NAME" --ioapic on

# Optional: Enable EFI if required
# VBoxManage modifyvm "$VM_NAME" --firmware efi

echo "OPNsense VM creation script has finished."
VBoxManage showvminfo "OPNSense" | grep -i "NIC"
1
2
3
4
5
6
oscar@itm2:~/scripts$ VBoxManage showvminfo "OPNSense" | grep -i "NIC"

NIC 1:                       MAC: 08002778CB05, Attachment: Bridged Interface 'eno2', Cable connected: on, Trace: off (file: none), Type: 82540EM, Reported speed: 0 Mbps, Boot priority: 0, Promisc Policy: deny, Bandwidth group: none

NIC 2:                       MAC: 080027F84436, Attachment: Internal Network 'intnet', Cable connected: on, Trace: off (file: none), Type: 82540EM, Reported speed: 0 Mbps, Boot priority: 0, Promisc Policy: deny, Bandwidth group: none
USED COMMANDS
1
2
3
4
5
6
7
8
9
10
11
12
13
14
15
16
17
18
19
20
21
22
23
24
25
26
27
28
29
30
  251  VBoxManage startvm "OPNSense" --type headless
  252  VBoxManage list vms
  253  VBoxManage list runningvms

  302  wget https://mirror.serverion.com/opnsense/releases/24.7/OPNsense-24.7-dvd-amd64.iso.bz2
  306  bunzip2 -k OPNsense-24.7-dvd-amd64.iso.bz2
  369  VM_NAME="OPNSense"
  376  COMPRESSED_ISO_PATH="/home/oscar/Downloads/OPNsense-24.7-dvd-amd64.iso.bz2"
  377  ISO_PATH="/home/oscar/Downloads/OPNsense-24.7-dvd-amd64.iso"
  378  VBOX_DISK="/home/oscar/VirtualBox VMs/OPNSense/opnsense.vdi"
  379  VM_RAM=6144
  380  VM_VRAM=16
  381  VM_CPUS=4
  382  DISK_SIZE=20480

  389  VBoxManage createvm --name "$VM_NAME" --ostype "FreeBSD_64" --register
  390  VBoxManage modifyvm --filename "$VBOX_DISK" --size $DISK_SIZE
  391  VBoxManage storagectl "$VM_NAME" --name "SATA Controller" --add sata --cotroller IntelAhci
  392  VBoxManage storagectl "$VM_NAME" --name "SATA Controller" --add sata --controller IntelAhci
  393  VBoxManage storageattach "$VM_NAME" --storagectl "SATA Controller" --port 0 --device 0 --type hdd --medium "$VBOX_DISK"
  394  VBoxManage createhd --filename "$VBOX_DISK" --size 20480
  395  VBoxManage storageattach "$VM_NAME" --storagectl "SATA Controller" --port 0 --device 0 --type hdd --medium "$VBOX_DISK"
  396  VBoxManage storagectl "VM_NAME" --name "IDE Controller" --add ide
  397  VBoxManage storagectl "$VM_NAME" --name "IDE Controller" --add ide
  398  VBoxManage storageattach "$VM_NAME" --storagectl "IDE Controller" --port 0 --device 0 --type dvddrive --medium "$ISO_PATH"
  399  VBoxManage modifyvm --boot1 dvd --boot2 disk --boot3 none --boot4 none
  400  VBoxManage modifyvm "$VM_NAME" --boot1 dvd --boot2 disk --boot3 none --boot4 none
  404  VBoxManage modifyvm "$VM_NAME" --nic1 bridged --bridgeadapter1 "eno1"
  405  VBoxManage modifyvm "$VM_NAME" --nic2 intnet
  406  VBoxManage modifyvm "$VM_NAME" --ioapic on
https://chatgpt.com/share/cb2a0b74-af8a-43a5-903a-d2ee96803e5c
how to enable RDP protocol in a ubuntu server?1 2 3 4 5 6 7 8
sudo apt update sudo apt install xrdp -y sudo apt install xfce4 xfce-goodies -y echo xfce4-session > ~/.xsession sudo sed -i.bak '/fi/a startxfce4' /etc/xrdp/startwn.sh sudo systemctl restart xrdp sudo ufw allow 3389/tcp sudo systemctl enable xrdp
- how can I verify which is the running desktop environment in a ubuntu machine terminal?
1
2
3
4
5
6
7
8
9
10
11
echo $XDG_CURRENT_DESKTOP
echo $DESKTOP_SESSION
ps -e | grep -E -i 'gnome|kde|xfce|lxde|mate|cinnamon|openbox|fluxbox'
loginctl show-session $(loginctl show-user $USER -p Display --value) -p Type
gnome-shell --version

sudo apt install xdpyinfo
xdpyinfo | grep -A 10 "screen #0"

ls /usr/share/xsessions/
We lost connectivity ![[Pasted image 20240801134418.png]]
Technical Requests
- Verify with admin the enabling of bidirectional traffic port 3389 tcp
- If that does not work of if it is not the problem, then, request for a new Ubuntu 22.04 server with desktop installation.
We found a big problem.
Is it possible to create a pre-configured Ubuntu server machine?
PENDING TO ADD DOCUMENTATION ABOUT THE FOUND ERROR (delay: 2 weeks)
This post is licensed under CC BY 4.0 by the author.